Elderberry syrup is like the McGyver of antioxidants. For thousands of years, people have turned to elderberry syrup to boost their immune system during cold and flu season. Not only have people used this as a preventative measure, but it is the go-to holistic remedy for those who began feeling symptoms within 1-2 days.
I wasn’t a believer until a couple of years ago when I began feeling a sore throat. Within a couple of days, I procured some Elderberry syrup and my symptoms were gone within two days. While I’m definitely not a doctor, I’ve found that this recipe has aided in warding off colds and flues for me and my family over the past couple of years. The best part is that this doesn’t have to be served as a witchy kitchen experiment, but can be naturally added to some of our favorite foods.
Here’s the skinny on our favorite cold-weather kitchen witch food to keep you and your family in tip-top:
What Is Elderberry Syrup

Elderberry syrup is a water-based syrup made from elderberries. Elderberries are the dark purple berry from the European elder tree. Traditionally, Native Americans used it to treat infections, while the ancient Egyptians used it to improve their complexions and heal burns. This super fruit is high in vitamin C, dietary fiber, anthocyanins, and they are a good source of phenolic acids, flavonols. The berries are used to make juice, jellies, syrup, medicine, food flavoring, and in making wine.
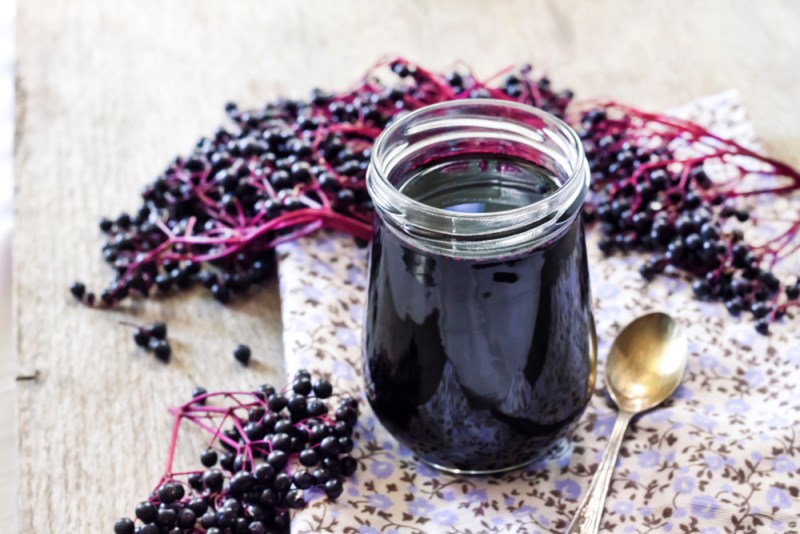
Elderberry Syrup Recipe
Ingredients
Makes 3 pint-sized jars*
- 2 cup dried Elderberries
- 4 Tbsp Hibiscus
- 4 Tbsp Chamomile
- 8 cups Water
- 2-inch knob ginger, chopped, fresh
- 4 tablespoons lime juice
- 2 Cinnamon Sticks
- 5 Cardamom Pods
- 2 cups Raw Honey
Instructions

Step 1: Put the Ingredients in the Instant Pot
Place all ingredients together inside the instant pot, except for the honey.
Step 2: Set the Instant Pot on High for 20 minutes
This will cool on the manual high pressure for 20 minutes. Make sure the valve is sealed closed so that the cooker stays pressurized and that the warming setting is switched off.
Step 3: Release the pressure
Turn that sweet valve when it’s time and get ready to waft your witchy brew.
Step 4: Thicken
Begin by stirring in your honey while the mixture is nice and hot. You can take it from here, or if you want a thicker texture, you can turn the saute setting on the instant pot and cook it down for about 15 minutes or so. If you decide to cook it down, make sure to stir.
Step 5: Strain & Package
Cheesecloth works especially well for this part, especially when using chamomile so that you have a really nice clean syrup without leftover herbs. When it comes to packaging there are a few options: Refrigeration, freezing, or canning. You may choose a mix of all three depending on how you plan to use your magical potion. Read on for more details.
Other Methods To Prepare

Stovetop
For non-instant pot-ers, you can still make an awesome syrup on the stovetop! You can follow the same instructions for the instant pot recipe above, you’ll just want to cook the contents for about 40-45 minutes on high heat
Tincture
To make an elderberry tincture you MUST use fully ripe Sambucus nigra berries. Most elderberries are toxic unless fully cooked. If you decide to go this route, we love this recipe:
- Step 1: Fill your pint jar half full with Sambucus nigra berries
- Step 2: Add 80 proof alcohol to the jar (leaving ~1 in. headspace)
- Step 3: Place lid, leave for 4-6 weeks
- Step 4: Strain and place in a light-tight bottle (discard berries)
The tincture has similar dosing recipes to the syrup, but you may not want to use it for food, rather just for medicinal purposes, due to the taste. *If you are feeling sick, please consult a health care provider. The information provided here is based on commonly based dosing instructions and has not been affirmed by the FDA.
Health Benefits of Elderberry

Since the middle ages, Elderberry has been used for medicinal purposes. In recent years, it has been a go-to for boosting the immune system and for reducing the impact of flu-like symptoms. According to WebMD, Elderberry syrup is commonly used to alleviate the symptoms of:
- Constipation
- Flu (influenza)
- Heart disease
- The common cold
- High levels of cholesterol
- A mild form of gum disease (gingivitis)
- Obesity
- Cancer
- Chronic fatigue syndrome (CFS)
Aside from providing support in the onset of sickness, elderberry syrup can be a powerful preventative measure. Throughout the flu season, it is can be taken on a daily basis, similarly to Airborne or Emergen-C.
Ways To Eat

- As a glaze. Easily mix your elderberry syrup with other sauces for tofu. Seitan, tempeh, fish, or meat marinades.
- Freeze for later. Many people use elderberry syrup as a replacement for cough syrup, and its best to have it ready to go when it strikes. You can pre-freeze portions of it for when you or your family needs it most. Elderberry stays for about a year in the freezer.
- Morning gummies. You can take the syrup and make them into gummy bears for a daily dose of immune-boosting power. Simply take the homemade elderberry syrup and make gummies.
- In a kombucha mocktail. Elderberry pairs wonderfully with the effervescent texture of kombucha, and we recommend pairing this power mocktail with some ginger-infused kombucha.
- On top of overnight oats. There are so many delicious flavors for overnight oats, and why not add a little boost to your morning routine?
- In a smoothie. Elderberry syrup can offer a nice little kick in your morning smoothie with its tart flavor and medicinal properties.
- On top of pancakes. Just like your favorite syrups, but this one has a special immune-boosting kick!
- As a morning supplement. You can take 1-2 tablespoons in the morning to boost your immune system.
Ways To Store Elderberry Syrup

Refrigeration
Most reports show that elderberry syrup is good in the refrigerator for up to 2 months in an airtight container. So, after you make your syrup, make sure to store properly. This will not keep at room temperature.
Freezer: up to 12 months
A freezer is a wonderful option if you plan on using the elderberry syrup as more of a supplement. The key here is to make sure to freeze your syrup in portion-sized containers. We recommend silicone ice cube trays or this. Specifically smaller sized ones, so that you have it when you need it most. Nothing is worse than feeling a cold or flu come on and not having what you need to fight it in the beginning. Elderberry syrup to the rescue!! If you have a family, we recommend keeping multiple doses on deck so that if the sickness matriculates, you are prepared.
Hot Water Bath Canning: up to 12 months
Canning is a great way to preserve all kinds of goodies. The best part is that having something that is shelf-stable, which means you’ll likely have it exactly when you need it. In order to get a good and safe product here, you will want to sterilize new mason jar lids as you are making your syrup. And, after they are both nice and done, you will water bath the mason jars and add on the sterilized lids. If the seal is not depressed, then you will need to freeze or refrigerate the syrup, as it is not shelf-stable on its own.
Thanks for reading! Have you made elderberry syrup before? If so, how are you using it?